- Published on
Superfast Telemetry Setup for Next.js with OpenTelemetry, Prometheus, and Grafana
- Authors

- Name
- Athos Georgiou
Superfast Telemetry Setup for Next.js with OpenTelemetry, Prometheus, and Grafana
Ever felt that setting up telemetry for your Next.js application was too complex or resource-intensive? Well, I have, and after spending a few hours piecing everything together, I realized it's actually quite straightforward to get it up and running. So, why not share?
In this guide, I'll walk you through setting up a practical telemetry system for your Next.js app using OpenTelemetry, Prometheus, and Grafana. You can have everything up and running in just a few minutes.
Prerequisites
Before we jump in, let's make sure you've got everything you need:
- Node.js - The JavaScript runtime your Next.js app runs on.
- Next.js - The React framework we're going to instrument.
- Docker - We'll use this to run Prometheus and Grafana in containers.
Got everything? Great! Let's go.
Step 1: Integrating OpenTelemetry with Next.js
OpenTelemetry is an awesome open-source framework that gives you standardized tools to collect metrics, logs, and traces from your application.
Install OpenTelemetry Packages
First, we need to install the necessary OpenTelemetry packages. Head over to your project's root directory and run (I prefer to use yarn, but npm and pnpm will do just fine):
npm install \
 opentelemetry \
 @opentelemetry/api \
 @opentelemetry/exporter-otlp-grpc \
 @opentelemetry/exporter-prometheus \
 @opentelemetry/host-metrics \
 @opentelemetry/instrumentation \
 @opentelemetry/instrumentation-http \
 @opentelemetry/instrumentation-runtime-node \
 @opentelemetry/sdk-node \
 @opentelemetry/semantic-conventions
You can probably get away with installing just:
npm install \
 opentelemetry \
 @opentelemetry/exporter-prometheus \
 @opentelemetry/host-metrics \
 @opentelemetry/instrumentation \
 @opentelemetry/instrumentation-http \
 @opentelemetry/instrumentation-runtime-node
However, you may encounter the following warnings:
warning " > @opentelemetry/exporter-prometheus@0.52.1" has unmet peer dependency "@opentelemetry/api@^1.3.0".
warning "@opentelemetry/exporter-prometheus > @opentelemetry/core@1.25.1" has unmet peer dependency "@opentelemetry/api@>=1.0.0 <1.10.0".
warning "@opentelemetry/exporter-prometheus > @opentelemetry/resources@1.25.1" has unmet peer dependency "@opentelemetry/api@>=1.0.0 <1.10.0".
warning "@opentelemetry/exporter-prometheus > @opentelemetry/sdk-metrics@1.25.1" has unmet peer dependency "@opentelemetry/api@>=1.3.0 <1.10.0".
warning " > @opentelemetry/host-metrics@0.35.3" has unmet peer dependency "@opentelemetry/api@^1.3.0".
warning " > @opentelemetry/instrumentation@0.52.1" has unmet peer dependency "@opentelemetry/api@^1.3.0".
warning " > @opentelemetry/instrumentation-http@0.52.1" has unmet peer dependency "@opentelemetry/api@^1.3.0".
warning " > @opentelemetry/instrumentation-runtime-node@0.6.0" has unmet peer dependency "@opentelemetry/api@^1.3.0".
To avoid these hassles, it's better to install all packages with their dependencies in one go.
Configure OpenTelemetry for Your Project
Now that you've installed the packages, let's set up OpenTelemetry in your Next.js project.
- Create a new file called
instrumentation.jsin the root of your project. This file will dynamically load Node.js-specific instrumentation. Here's what it should look like:
// instrumentation.ts
export const register = async () => {
  if (process.env.NEXT_RUNTIME === 'nodejs') {
    await import('./instrumentation-node')
  }
}
- Next, create another file called
instrumentation-node.ts. This is where the magic happens—this file configures the OpenTelemetry instrumentation for your Node.js environment:
// instrumentation-node.ts
import { config as dotenvConfig } from 'dotenv'
import { resolve } from 'path'
import { PrometheusExporter } from '@opentelemetry/exporter-prometheus'
import { HostMetrics } from '@opentelemetry/host-metrics'
import { registerInstrumentations } from '@opentelemetry/instrumentation'
import { HttpInstrumentation } from '@opentelemetry/instrumentation-http'
import { RuntimeNodeInstrumentation } from '@opentelemetry/instrumentation-runtime-node'
import {
  Resource,
  detectResourcesSync,
  envDetector,
  hostDetector,
  processDetector,
} from '@opentelemetry/resources'
import { MeterProvider } from '@opentelemetry/sdk-metrics'

// Load .env.local
dotenvConfig({ path: resolve(process.cwd(), '.env.local') })

const exporter = new PrometheusExporter({
  port: 9464,
  endpoint: '/metrics',
  host: '0.0.0.0', // Listen on all network interfaces
})

const detectedResources = detectResourcesSync({
  detectors: [envDetector, processDetector, hostDetector],
})

const customResources = new Resource({})

const resources = detectedResources.merge(customResources)

const meterProvider = new MeterProvider({
  readers: [exporter],
  resource: resources,
})

const hostMetrics = new HostMetrics({
  name: `otel-metrics`,
  meterProvider,
})

registerInstrumentations({
  meterProvider,
  instrumentations: [new HttpInstrumentation(), new RuntimeNodeInstrumentation()],
})

hostMetrics.start()
- Let's make sure everything ties together by updating your
next.config.jsfile. This will ensure that the instrumentation is properly hooked into the Next.js runtime:
// next.config.js
/** @type {import('next').NextConfig} */
const nextConfig = {
  images: {
    domains: ['utfs.io'],
  },
  experimental: {
    instrumentationHook: true,
    serverComponentsExternalPackages: ['@opentelemetry/instrumentation'],
  },
}

module.exports = nextConfig
- To allow Prometheus to scrape metrics from your Next.js app, create a
prometheus.ymlconfiguration file:
scrape_configs:
  - job_name: 'nodejs-app'
    scrape_interval: 5s
    static_configs:
      - targets: ['host.docker.internal:9464']
- Finally, start your Next.js app:
npm run dev
You should see output like this:
npm run v1.22.22
$ next dev
▲ Next.js 14.2.6

- Local: http://localhost:3000
- Environments: .env.local
- Experiments (use with caution):
  · instrumentationHook

✓ Starting...
✓ Compiled /instrumentation in 588ms (291 modules)
✓ Ready in 2.2s
You're now ready to start collecting some metrics. Head over to http://localhost:9464/metrics. You should be seeing something like this:
# HELP http_server_duration Measures the duration of inbound HTTP requests.
# UNIT http_server_duration ms
# TYPE http_server_duration histogram
http_server_duration_count{http_scheme="http",http_method="GET",net_host_name="host.docker.internal",http_flavor="1.1",http_status_code="200",net_host_port="9464"} 14
http_server_duration_sum{http_scheme="http",http_method="GET",net_host_name="host.docker.internal",http_flavor="1.1",http_status_code="200",net_host_port="9464"} 5705.536499999999
http_server_duration_bucket{http_scheme="http",http_method="GET",net_host_name="host.docker.internal",http_flavor="1.1",http_status_code="200",net_host_port="9464",le="0"} 0
http_server_duration_bucket{http_scheme="http",http_method="GET",net_host_name="host.docker.internal",http_flavor="1.1",http_status_code="200",net_host_port="9464",le="5"} 0
http_server_duration_bucket{http_scheme="http",http_method="GET",net_host_name="host.docker.internal",http_flavor="1.1",http_status_code="200",net_host_port="9464",le="10"} 0
http_server_duration_bucket{http_scheme="http",http_method="GET",net_host_name="host.docker.internal",http_flavor="1.1",http_status_code="200",net_host_port="9464",le="25"} 0
http_server_duration_bucket{http_scheme="http",http_method="GET",net_host_name="host.docker.internal",http_flavor="1.1",http_status_code="200",net_host_port="9464",le="50"} 0
http_server_duration_bucket{http_scheme="http",http_method="GET",net_host_name="host.docker.internal",http_flavor="1.1",http_status_code="200",net_host_port="9464",le="75"} 0
Nice! The hard stuff is done now. The rest should be smooth sailing.
Step 2: Deploying Prometheus & Grafana
Prometheus will handle collecting and storing the metrics that OpenTelemetry exposes, and Grafana will let you visualize these metrics beautifully.
Running Prometheus & Grafana with Docker
(Eww, Docker) Create a docker-compose.yml file in your project directory to spin up Prometheus and Grafana:
services:
  prometheus:
    container_name: prometheus
    image: prom/prometheus:latest
    restart: always
    volumes:
      - ./prometheus.yaml:/etc/prometheus/prometheus.yml
    ports:
      - '9090:9090'
    networks:
      - my-app-network

  grafana:
    container_name: grafana
    image: grafana/grafana:latest
    ports:
      - '4000:3000'
    depends_on:
      - prometheus
    networks:
      - my-app-network

networks:
  my-app-network:
    driver: bridge
Run the following command to get everything up and running:
docker-compose up --build -d
Prometheus should now be available on port 9090 and Grafana on port 4000.
To stop them, just run:
docker-compose down
Connecting Grafana to Prometheus
Now that you've got everything running, let's get Grafana hooked up to Prometheus:
- Open your browser and go to
http://localhost:4000to access Grafana. Log in with the default credentials (admin/admin). - To add Prometheus as a data source in Grafana:
- Navigate to Configuration > Data Sources > Add data source.
- Select Prometheus.
- Set the URL to
http://prometheus:9090. - Click Save & Test to make sure the connection works.
Step 3: Creating Dashboards in Grafana
With Grafana connected to Prometheus, it's time for the fun part—creating dashboards!
- Head over to Create > Dashboard in Grafana.
- Click Add new panel to start creating your first visualization.
- Choose the metrics you want to display from the Prometheus data source.
Grafana is incredibly flexible, so feel free to play around with the settings and customize your dashboards to your heart's content.
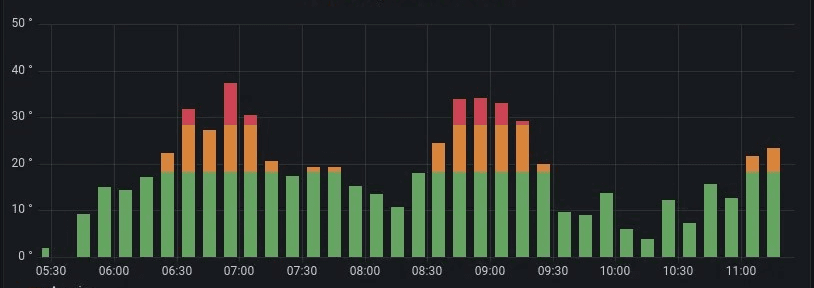
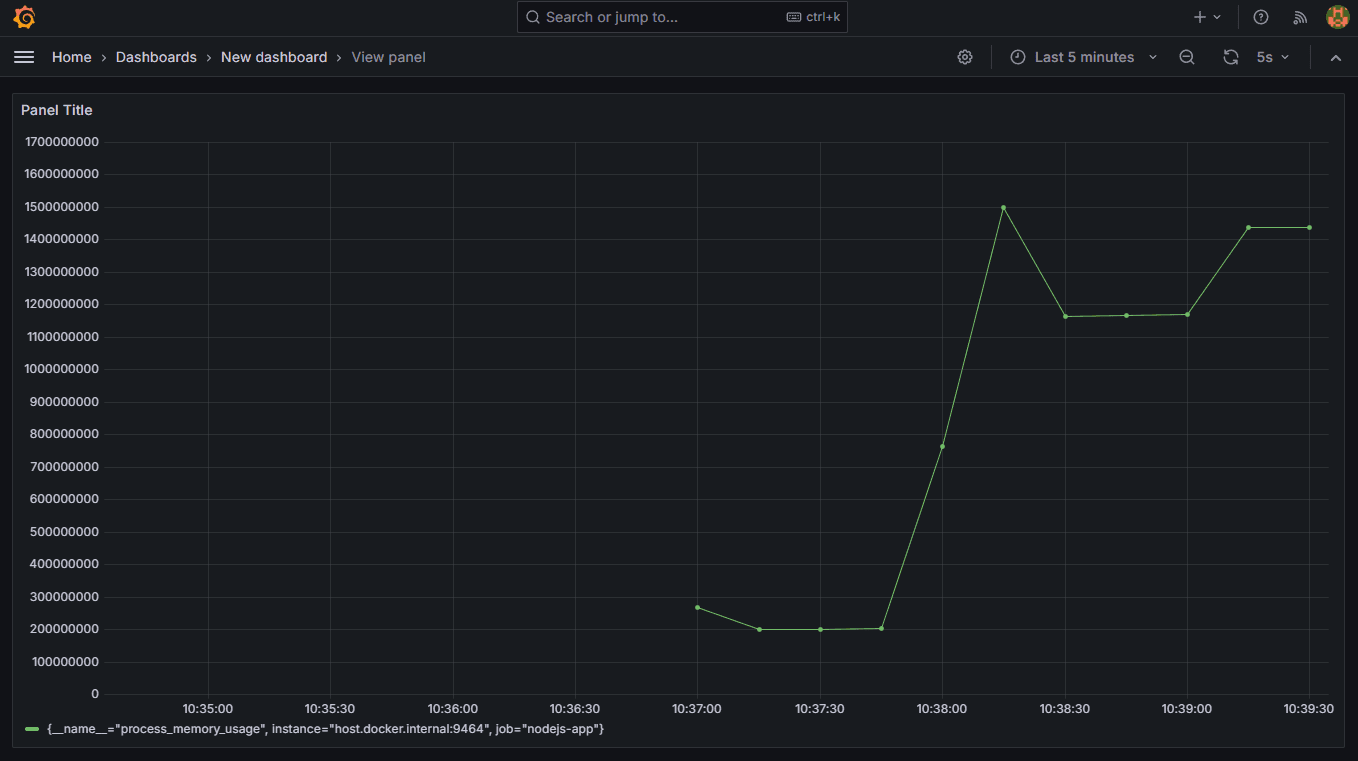
Here's an example of tracking process memory usage, with this setup:
That's it!
And there you have it! You've just set up a fully functional telemetry system for your Next.js application using OpenTelemetry, Prometheus, and Grafana. By adding OpenTelemetry into your Next.js app, you're not just keeping an eye on basic metrics like CPU usage and memory consumption, but also capturing detailed traces of how your app handles requests, including those involving LLM processing. Technically, sky's the limit on what you can track with this setup.
I had a blast putting this together and I hope it can help you getting useful insights! Perhaps I'll explore Grafana Alloy next, as it streamlines the process quite a bit.
Until next time, happy coding!